How to install WHMCS in cPanel or Direct Admin?
- Login to your cPanel or Direct Admin Hosting account. (cPanel is usually located at domain.com:2083 and Direct Admin at domain.com:2222)
- Locate and click on the Softaculous application icon.

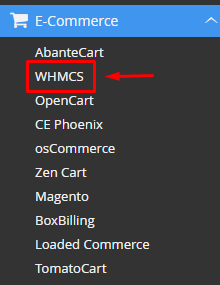
- You should now be presented with the default Softaculous Layout; go to the E-Commerce Section > WHMCS
- Once presented with the WHMCS overview page, click on the blue "Install Now" button.
- You will now be presented with an array of options, which we have included explanations for below:
Software Setup
a.) Choose Installation URL - Where you would like WHMCS to be installed, we usually recommend either putting it in a sub-directory like domain.com/whmcs or on a sub-domain (whmcs.domain.com)
b.) Data Directory - Where WHMCS stores its files like user attachments and logs. This setting does not require any configuring and can be left on the default setting provided by Softaculous.
c.) CRON Job - The Cron Job setting for WHMCS. Leave it as the default setting for now. You will configure it later on when setting up automation within WHMCS.
Site Settings
a.) Company Name - The name WHMCS will use for your Company in invoices, titles, etc
b.) Admin Folder - Your administrator folder location. You can usually leave this as the default. For added security, you can change this to something unique, as it will change your admin login URL to something non-standard.
c.) Company Email - The email WHMCS will use to set as your contact email.
d.) Valid License Key - Input your WHMCS License key.
Admin Account
a.) Admin Username - The username you will use to log in to your WHMCS admin area
b.) Admin Password - Password for your administrator account
c.) First Name - Name that will be set for your administrator account
d.) Last Name - Surname that will be set for your administrator account
e.) Admin Email - Email attached to your administrator account
Choose Language
a.) Select the Admin Language of your WHMCS Admin Area
b.) Select Site Language - Language of your WHMCS Client Area
Advanced Settings - *Leave as the default
a.) Database Name - Your WHMCS database's name.
b.) Disable Update Notifications Emails - Choose if you'd like notifications once an update is available for WHMCS
c.) Auto Upgrade - Upgrade WHMCS automatically through Softaculous.
d.) Backup Location - Location of WHMCS backups within Softaculous
e.) Automated backups - Backup configuration for WHMCS with Softaculous
f.) Backup Rotation - How frequently are backups taken - Once you have configured the installation to your preferred preference, click on the blue "Install" button. Once installed, you can also optionally include your email address for Softaculous to send the new WHMCS login details.
- That's it! WHMCS should now begin to install; it usually takes up to 2-4 minutes to fully complete.


